How I built a fully autonomous personal assistant in n8n using MCP

My personal assistant just scheduled three meetings, summarized my unread emails, and drafted a reply – all while I was making coffee.
This wasn’t done with a simple script. I built a true AI agent by designing a custom automation workflow in n8n and running it on a Hostinger VPS.
The core of this system is the Model Context Protocol (MCP), which enables an AI “brain” to securely connect with and control other applications, such as Google Calendar and Gmail.
It’s a powerful way to create a self-hosted n8n personal assistant that interprets requests and automates tasks across multiple platforms.
Continue reading as I guide you through my entire process, from initial design to final build, and provide you with a downloadable workflow template so you can deploy your own assistant right away.
What is an MCP-powered personal assistant?
An MCP-powered personal assistant is an automation workflow that utilizes an AI language model to interpret requests and the Model Context Protocol (MCP) to execute complex, multi-step tasks across various applications.
This approach to AI integration lets you build a truly multi-platform assistant.
To make sense of this, let’s break down the three core components:
- n8n. The automation platform where the entire workflow lives. Think of n8n as the workshop where you build and run your assistant. It’s the foundation for this open-source automation project with the MCP.
- The AI “brain.” A large language model (LLM), like Gemini or GPT-4, that interprets your commands. When you ask it to do something, it determines the necessary steps and selects the appropriate tools to trigger tasks.
- The “nervous system (MCP)”. Acting as the assistant’s nervous system, MCP is the communication layer that lets the AI brain securely control other tools, such as Google Calendar or Gmail. For this type of agentic work, an n8n-MCP integration is far more reliable than using simple webhooks, as it establishes a persistent and secure channel for executing complex commands.
Why I decided to build this assistant
I decided to build this personal assistant to solve a specific problem: reducing the time I spent switching between apps for routine tasks.
My morning routine was a classic example. I’d check my Google Calendar for the day’s schedule, then switch to Gmail to scan for urgent emails, and then open another app to create a to-do list based on what I found.
It was a repetitive, manual process that wasted valuable time.
While I could create separate, simple automations for some of these steps, they couldn’t “talk” to each other. A basic workflow can fetch calendar events, and another can check emails, but neither can understand context or make decisions based on the other’s findings.
I needed more than just a script – I needed an AI-driven “agent” that could understand a natural language command like, “Summarize my morning and draft a priority list.”
To truly automate tasks with n8n in a dynamic way, I had to move beyond linear workflows. This justified the complexity of a full AI integration, leading me to design a system that not only followed instructions but also understood the intent behind them.
How I designed my assistant’s workflow
I designed my autonomous assistant’s workflow by conceptualizing the logic and then creating a visual diagram of the architecture before modifying any nodes in n8n.
First, I mapped the logic. Before you can create an automation workflow, you need to understand every step of the process you’re trying to replace.
I began by writing down the exact sequence of events for a common task, such as scheduling a meeting. This involved defining the inputs (the user’s request), the decision points (required information like the date or number of attendees), and the final output (a calendar event and a confirmation message).
Secondly, I visualized the entire architecture. A simple list isn’t enough for a dynamic system, so I created a diagram to show how all the components connect and how data flows between them. This visual map shows the complete journey:
- The command input. The process starts when the assistant receives a command from a user.
- The AI decision core. The command is sent to the AI model, which acts as the central decision-making hub (the “brain”). It interprets the request and decides which tool is needed to fulfill it.
- Tool selection via MCP. This is the critical step. The AI doesn’t directly control the tool. Instead, it sends a formatted request to the MCP client node in n8n.
- Execution and result. The MCP client node securely triggers the correct tool (such as Google Calendar) to take action. Once the task is complete, it returns a result (like “event created successfully”) through the workflow.
Here’s what that architecture looks like on the Miro board:

What I prepared before building my assistant
To build my self-hosted n8n personal assistant, I prepared a reliable server, an n8n instance, and the API credentials for the services I wanted to connect.
Here are the specific prerequisites:
- A virtual private server (VPS). To keep my data private and to maintain complete control, I built this assistant on a self-hosted n8n VPS. I chose Hostinger because it lets me skip the entire setup process, as n8n comes pre-installed as a template. It provides full root access and dedicated resources that I need to ensure the assistant remains stable and performs well 24/7.
- A working n8n instance. Usually, after setting up a server, the next step is to install n8n. However, since I used Hostinger, my n8n instance was pre-installed and ready to go. If you’re setting up an instance on a different server or prefer manual setup using commands, this guide on how to install n8n covers the details.
- API keys and credentials. The final step was to gather the API credentials that would let my n8n workflow securely access my data in other applications. I needed credentials for three specific services:
- OpenAI. To provide the AI “brain” for the assistant.
- Google Workspace. To grant access for reading my calendar and managing emails in Gmail.
- Slack. To create a notification system. I configured it so that if a workflow failed, it would immediately send an alert to a private Slack channel, letting me fix the issue.
📈 By the numbers
Since its launch in January 2025, Hostinger’s n8n template has surpassed 50,000 total installations as of September 2025. Averaging around 800 new installs per month, it has quickly become Hostinger’s #1 most popular template and its second-most popular VPS product overall, behind only the regular VPS service.

How I built my personal assistant in n8n with MCP
My process for this n8n-MCP project breaks down into five direct stages: setting up the conversation entry point, building the AI core with memory, establishing the tool communication channel with MCP, connecting the assistant’s tools, and implementing error handling.
If you want to jump right in or follow along with a completed version, you can download the full workflow templates I used here:
Step 1: Set up the conversation entry point
The first step was to create the entry point for my assistant. I achieved this by adding the When chat message received node to my workflow.
This specific node is a Chat Trigger, serving as the front door for the entire automation. Its job is to listen for incoming messages and start the workflow whenever a new one arrives.
For this build, I used the built-in testing interface that this node provides. So, when I manually execute the workflow in the n8n editor, a chat box appears in the corner.

This lets me send prompts directly to the assistant to test its responses without needing to set up any external application.
Step 2: Build the AI core with an agent, LLM, and memory
With the entry point configured, the next step was to build the assistant’s brain. I added an AI Agent node and connected it to a language model for thinking and a memory node for context.
The central component here is the Personal Assistant node, which receives the prompt from the trigger and orchestrates the entire response.
I then connected two essential inputs to this agent:
- OpenAI Chat Model. This is the LLM that does the actual thinking. I configured it to use the gpt-4.1-2025-04-14 model. It’s responsible for understanding the user’s request.

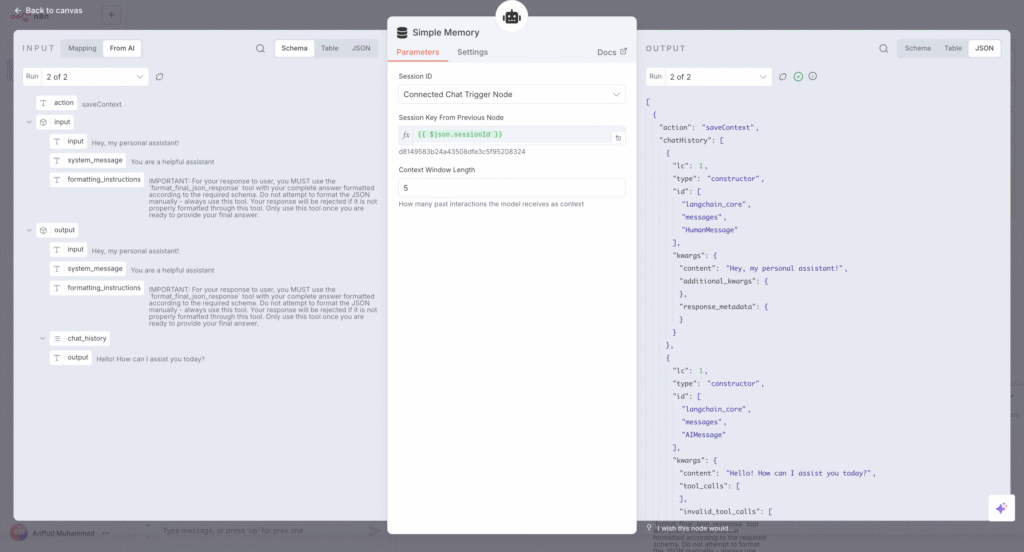
- Simple Memory. This node provides the assistant with conversational memory, letting it recall previous messages within the same session. This is crucial for handling follow-up questions without me having to repeat the context.
To guide the LLM’s behavior, I configured a system prompt within the Personal Assistant agent node. This is a critical step where I provide the AI with its core instructions, telling it how to act and what its purpose is. For example, I included instructions like:
You are a helpful personal assistant. Based on the user’s request, you must choose one of the available tools to assist them.
This ensures the assistant stays on task and uses the tools I provide.
Step 3: Establish AI-tool communication channel with MCP
The AI core requires a way to communicate with its tools. For this, I set up a two-part system using the MCP Server Trigger and the MCP Client nodes.
This process establishes a secure communication channel for the AI agent to interact with tools. Here’s how I configured it:
- I added an MCP Server Trigger node to my canvas. This node acts as a central hub that listens for instructions from the AI agent. After that, I copied its unique webhook URL, which is needed for the client to connect to it.

- I also included an MCP Client node. I configured its SSE Endpoint field by pasting the URL I copied from the MCP Server Trigger. Then, I connected the MCP Client node to the Tool input of my Personal Assistant agent.

This two-node setup is the core of the MCP in this workflow. The agent doesn’t call tools like Google Calendar directly.
Instead, it sends an instruction to the MCP Client, and the client securely passes that message to the MCP Server, which then activates the correct tool. This makes the system more organized and secure.
Step 4: Connect the assistant’s tools
With the communication channel ready, I equipped my assistant with the necessary skills by adding tool nodes for each desired capability and connecting them all to the MCP Server Trigger.
The MCP Server Trigger acts as a switchboard for all the assistant’s abilities. Any node that I connect to becomes a tool that the AI agent can choose to use.
For this project, I gave my assistant skills across three main services:
- Google Calendar. I added several Google Calendar Tool nodes for actions like creating, updating, and finding events. For example, the Create event node lets the assistant schedule new meetings.

- Gmail. I added Gmail Tool nodes to let the assistant find, read, and send emails. The Send email node, for instance, enables it to dispatch messages on my behalf.
- Google Drive. I used Google Drive Tool nodes to manage files. This included nodes for creating documents from text, searching for files, and sharing them.
With all the tools in place, the main workflow canvas is now complete. Here’s what it looks like:

Step 5: Implement robust error handling
The final step in building a reliable assistant is to plan for failures.
Instead of adding complex error logic to my main workflow, I created a dedicated error-handling workflow focused on notifications and linked it to my main assistant workflow using n8n’s settings.

My error workflow is simple. It starts with an Error Trigger node, a special trigger that runs only when another workflow assigned to it fails.
This trigger connects to a Slack node configured to send a message. I customized the notification to include dynamic data, such as the workflow name, the node that failed, and a direct link to the execution log. This way, I gather all the necessary details to debug the issue quickly.

Using Slack for notifications is a matter of preference. You can easily replace this node with another service. For example, you can set up an n8n Telegram integration to receive alerts, or follow our guide on integrating n8n with WhatsApp for notifications.
After saving the error workflow, the final step was connecting it. I went back to my main Personal Assistant workflow, opened the Settings menu, navigated to the Error Workflow field, and selected the new workflow I had just created.

What my personal assistant can do (practical demonstrations)
My AI personal assistant using n8n can now run workflows that handle multi-step tasks that traditionally require manual intervention. Here are a few practical examples of what it can do.
Important! Since this workflow is running in test mode, you must click the Execute Workflow button in the n8n editor before sending each command in the chat interface. If you don’t, the trigger won’t be active, and you’ll see a 404 Not Found error message.
Use case 1: Scheduling a meeting instantly
Scheduling meetings often involves checking my calendar, finding a free time slot, and then creating an invitation.
This use case demonstrates how the assistant can handle that entire process from a single text prompt, saving me several minutes of context switching.
- The command:
Schedule a meeting with alex@domain.tld for October 22, 2025, at 2 PM for an hour to discuss the project proposal.
- The process: Behind the scenes, the AI agent understands the request and triggers the Create event node in my workflow, passing along all the necessary details.
- The result: A moment later, I get a confirmation in the chat. The event is instantly added to my Google Calendar, and an invitation is sent to alex@domain.tld, which will also appear on their calendar.

Use case 2: Researching and creating a document
This use case shows how the assistant can act as a research and drafting partner. Instead of me having to find information and then manually create a document to store it, the assistant can do it in one step.
- The command:
Research the topic ‘What is Retrieval-Augmented Generation (RAG)?’ and create a document based on your findings.
- The process: When it receives this command, the agent uses the LLM’s internal knowledge to generate an explanation of RAG. It then passes this generated text directly to the Create file from text tool, which saves it as a new Google Doc.
- The result: The assistant replies in the chat, confirming the document has been created and providing a direct link to the new file. This lets me access the document immediately without having to search for it in Google Drive.

Use case 3: Drafting and sending emails
Drafting routine follow-up emails is another task that breaks my focus. This demonstration shows how I can delegate the entire process to the assistant, from composing the message to sending it.
- The command:
Send an email to taylor@domain.tld with the subject ‘Following Up’ and ask if they have had a chance to review the document I sent.
- The process: The agent parses this command to identify the recipient, subject line, and message body. It then feeds this information into the Send email tool, which connects to my Gmail account.
- The result: The assistant confirms the email has been sent. If I check my Sent folder in Gmail, I’ll see the new message, perfectly drafted and addressed, without me having to type a single word in the Gmail interface.

What are the limitations of my AI personal assistant?
While this n8n assistant is powerful, it’s important to understand its operational boundaries. Its effectiveness depends on the tools it’s connected to and the quality of its underlying AI model.
API and tool dependencies
The assistant’s biggest limitation is that its functionality is entirely dependent on the third-party services it connects to.
My n8n workflow sends instructions to external services like Google Calendar and Gmail; if those services are not working, my assistant cannot perform its tasks.
This creates two main risks that are outside of my control:
- Service downtime. For example, if the Google Calendar API is temporarily unavailable due to an issue on Google’s end, my assistant will be unable to schedule meetings. There is nothing I can do within my workflow to resolve this issue; the capability is currently unavailable until the external service is restored.
- API changes. Companies occasionally update their APIs to add new features or improve security. Sometimes these changes are “breaking,” meaning the n8n tool node that relies on the old version will stop working until the node is updated.
AI model constraints
The assistant is only as intelligent and reliable as the LLM that powers it. This presents two main constraints:
- Limited scope. The AI agent can only perform tasks that I have explicitly given it tools for. For instance, I can’t ask it to “book a flight” because I have not provided it with a flight-booking tool. It only knows how to use the specific Google Calendar, Gmail, and Drive tools that I connected earlier.
- Model reliability. LLMs have “token limits,” which are the maximum amount of text (input and output) they can process at one time. For very long conversations, complex requests in a single command, or when processing large documents, the model may lose context and fail to function correctly. LLMs can also sometimes “hallucinate,” which means they state incorrect information with complete confidence. The model might invent a detail for an event or misinterpret a complex email.
What are the best practices for the AI assistant?
To ensure my personal assistant runs securely, reliably, and efficiently, I follow these best practices for prompting, managing credentials, and monitoring performance.
Effective prompt engineering
The key to getting reliable results is effective prompt engineering. Instead of treating the AI like a search engine, I treat it like a talented intern and give it clear, detailed instructions in the system prompt.
A great way to structure these instructions is with the CLEAR framework:
- Context. I provide the background for the task, including the AI’s role and its primary goal. For instance:
You are a helpful personal assistant.
- Limitations. I set clear rules and define what the assistant should not do. For example:
You must not perform any action other than the ones provided.
- Examples. Providing examples of user requests helps the model understand intent. For instance, showing “what’s on my plate for Friday?” means it should use the calendar-finding tool.
- Actions. I explicitly list the tools the AI is allowed to use. For example:
Your available tools are Google Calendar, Gmail, and Google Drive.
- Refinements. Prompting is an iterative process. I test the assistant and refine the system prompt based on its performance to improve its accuracy over time.
This is covered in more detail in the Hostinger Academy video below.

Secure credential management
A critical best practice I follow is to never expose API keys directly in my workflow. Instead, I always use n8n’s built-in credential manager to store them securely.
This prevents your keys from being accidentally shared through screenshots or workflow export files.
n8n encourages this by prompting you to create or select a secure credential whenever you add a node that requires authentication, keeping the actual secret hidden from view.
Proactive maintenance and monitoring
An automation is only helpful if it’s reliable, so proactive maintenance is essential. My two main practices are:
- I regularly check the Execution Logs. This provides a history of every workflow run and is invaluable for spotting unexpected behavior or errors that might not trigger a full failure notification.
- I keep my n8n instance and its nodes up to date. This ensures I get security patches, bug fixes, and protection against failures caused by changes in third-party APIs. If you self-host n8n on Hostinger’s VPS like me, you can follow this guide on how to update n8n.
How can you enhance your AI assistant?
This initial build provides a strong foundation, but you can further expand its capabilities. Here are a few ideas to take your assistant to the next level:
- Add long-term memory. The current memory only lasts for a single session. To give the assistant a permanent memory, you can connect a database node (such as Redis or Postgres) to store the conversation history. You can also explore Retrieval-Augmented Generation (RAG) to provide the AI with additional context from your own documents, such as contact lists or project notes.
- Integrate more tools. The real power of this assistant comes from its customizability. You can add tool nodes for any service with an API. Consider connecting it to project management apps like Jira or Notion to manage tasks, or even financial tools to track expenses.
- Set up a custom GPT. For a more polished user interface, you can set up a Custom GPT in ChatGPT. By configuring its Action to point to your n8n Chat Trigger’s URL, you can interact with your assistant directly from the ChatGPT interface instead of n8n’s dashboard.
- Use local AI models. For enhanced privacy and to fully leverage open-source automation, you can replace the OpenAI node with a self-hosted model. A tool like Ollama lets you run powerful language models directly on your own server, keeping your data completely private.
- Implement voice commands. To make the assistant hands-free, you can add a transcription service at the beginning of your workflow. For example, a node using OpenAI’s Whisper API could transcribe an audio file or voice note into text, which is then passed to the agent as a command.
Key takeaways
Building this project showed me that combining n8n’s flexible automation with MCP’s robust communication protocol is what makes true AI agents possible. It’s the difference between a simple script and a system that can reason and act on my behalf.
I hope that this guide on how to build a personal assistant in n8n using MCP provides you with the workflow and the foundational knowledge to start building your own.
Now, what is the first repetitive task you’ll automate with your new assistant?
All of the tutorial content on this website is subject to Hostinger's rigorous editorial standards and values.

Ariffud is a Technical Content Writer with an educational background in Informatics. He has extensive expertise in Linux and VPS, authoring over 200 articles on server management and web development. Follow him on LinkedIn.
